Perspective image placement
Following "Pan and Zoom" in our last release in Kdenlive 0.8 there will be a new GUI for the Corners effect, unleashing its real power:
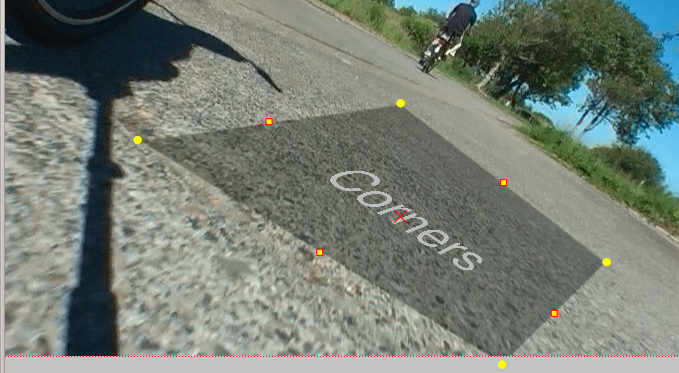
Corners was already available in Kdenlive 0.7.8 (under its frei0r name c0rners) but probably remained unrecognized because it was very hard to use. The x, y position of every corner had to be adjusted using a slider. In the next release this should be whole lot easier. The corners can be moved directly on the monitor. Additionally there are some more controls to make your life easier: The red cross in the center of the upper layer moves all corners at once. Using the controls on the edges of the upper layer you can move the two corners next to them.
Let's have a closer look at the interface and some of the parameters:

- This button is the new way to turn on the keyframe mode. Most effects supporting keyframes do now have this.
- This parameter controls the size (in pixels) of the alpha gradient the effect tries to create at the edges of the layer to make it composite smoother onto the bottom layer. Feathering with two edges switched is not implemented (yet).
- The interpolation functions are sorted from low quality and fast to high quality and slow. While editing I therefore always use Nearest Neighbor. When rendering for me Bilinear or Bicubic is usually sufficient. In most cases you won't see a difference when switching to higher quality options. Especially Lanczos should be used only when really needed for it is extremly slow.
- When compositing Transparent background has to be turned on. If the image already has an alpha channel (title, bluescreen stacked before corners, ...) you need to specify how the filter should combine the existing alpha channel with the channel it created.
- All effects with an on-monitor GUI (in 0.8 there will be three types of them) do now have their editing related controls located here. The two buttons at the top are Corners specific. This one (the top most) turns on/off the additional controls (move all corners, move two corners).
- This button turns on/off lines connecting the corners. This can come in handy if you want to do a precise placement. You can then turn of the top track of your composition and have a closer look at what is covered. Please note that when two corners are switched (lines cross each other) the filter won't produce a simple polygon.
Despite its power there are some things to consider before enjoying it:
The "c0rners" filter was introduced in frei0r 1.2. However when using keyframes and also when changing multiple parameters it was very, very slow. Additionally the parameter Alpha operation was not available. It is therefore highly recommended to upgrade to frei0r 1.3 (released today, 03/09/11).
You shouldn't use this effect to zoom into media with a resolution higher than the project resolution. If doing so the image will be scaled down first and then scaled up by c0rners afterwards. To avoid this loss use Pan and zoom. It will pass any downscaling. You can then afterwards apply c0rners for some fancy movements.
As you might have already noticed this effect can do much more than placing images inside each other.
I would therefore like to thank Marko for writing this awesome effect!
A quick note at the end: Attaching your video camera on a monopod and holding it upside down just a bit above the ground while riding a bike creates a nice look ;)