Clip Effects
Probably most of the time, many Kdenlive users will simply slap individual effects on individual timeline clips. For instance, as lighting conditions vary within the same source clip, multiple scenes taken from it might be in need of individual grading. Or you need to crop and place an individual clip, separately from others. So we’re all used to it, and we do it almost unconsciously.
But in some situations, we would like to ease and speed up our timeline work. Instead of laboriously setting up effect after effect on individual timeline clips, we want to add effects to either a specific bin clip or a timeline track once and for all…
Did you know that you can temporarily disable all timeline clip effects? Use Timeline > Disable timeline effects.
Effects on Project Bin Clips
Effects on bin clips allow you to, for instance, color grade a clip itself. All copies of it that you use in the timeline then will automatically use these effects. Also, all changes you make to the bin clip will immediately become effective on all copies in the timeline.
Please note that bin clip effects are applied first, before any timeline clip effects.
Apply Effects to Bin Clips
To apply effects to a clip in the project bin in general, simply drag and drop an effect from the effects pane (1) into your clip in the project bin (2). The parameters pane (3) then will switch to the effects applied to this particular bin clip. Adjust as you like.
If you later need to return to the bin clip effects in order to edit them again, simply select the clip in the project bin. The parameters pane (3) then will automatically switch to your bin clip’s effect stack.
Compare Before/After Effects
![]() Please note the split compare button at the top of the parameters pane (3): when active, the clip monitor (4) shows your clip in a before/after fashion:
Please note the split compare button at the top of the parameters pane (3): when active, the clip monitor (4) shows your clip in a before/after fashion:
- left half of clip monitor (4): your bin clip with all effects applied; the text «effect» to the left of the red divider (4) is a reminder of which side is showing effects, and which side is without effects.
- right half: your bin clip without any effects applied.
While hovering your mouse cursor over the clip monitor, you should notice a red vertical divider line appearing. Drag it to dynamically change the split between the clip parts with/without effects.
Temporarily Disable Bin Clip Effects
You can (temporarily) disable all effects on a single bin clip, by selecting it and then un-checking the Bin effects for… box at the top of the parameters pane (3). This works exactly the same as with effects applied to timeline clips.
 Bin clips that have effects directly applied on them show the effects signet: a star. It is overlaid on the clip thumbnail, as you can see to the right.
Temporarily disable ALL bin effects
 You can also temporarily disable all bin effects at once, using either a keyboard shortcut or a toolbar button. Unfortunately, this function is slightly hidden, as there is (yet) no menu item for it. You’ll need to either configure a shortcut for this action, or add the action to a toolbar:
- To configure a keyboard shortcut, go to Settings > Configure Shortcuts…, then search for «Disable Bin Effects». Now set your desired shortcut, click OK. Done.
- Alternatively, go to Settings > Configure Toolbars…, then search for the available action «Disable Bin Effects». Add it to whatever toolbar you like, such as the Timeline Toolbar by clicking the > button. Click OK. Done.
You can now quickly disable and enable all bin effects at once using either the shortcut or toolbar button you’ve configured above.
Effects on Tracks
Apply Effects to Tracks
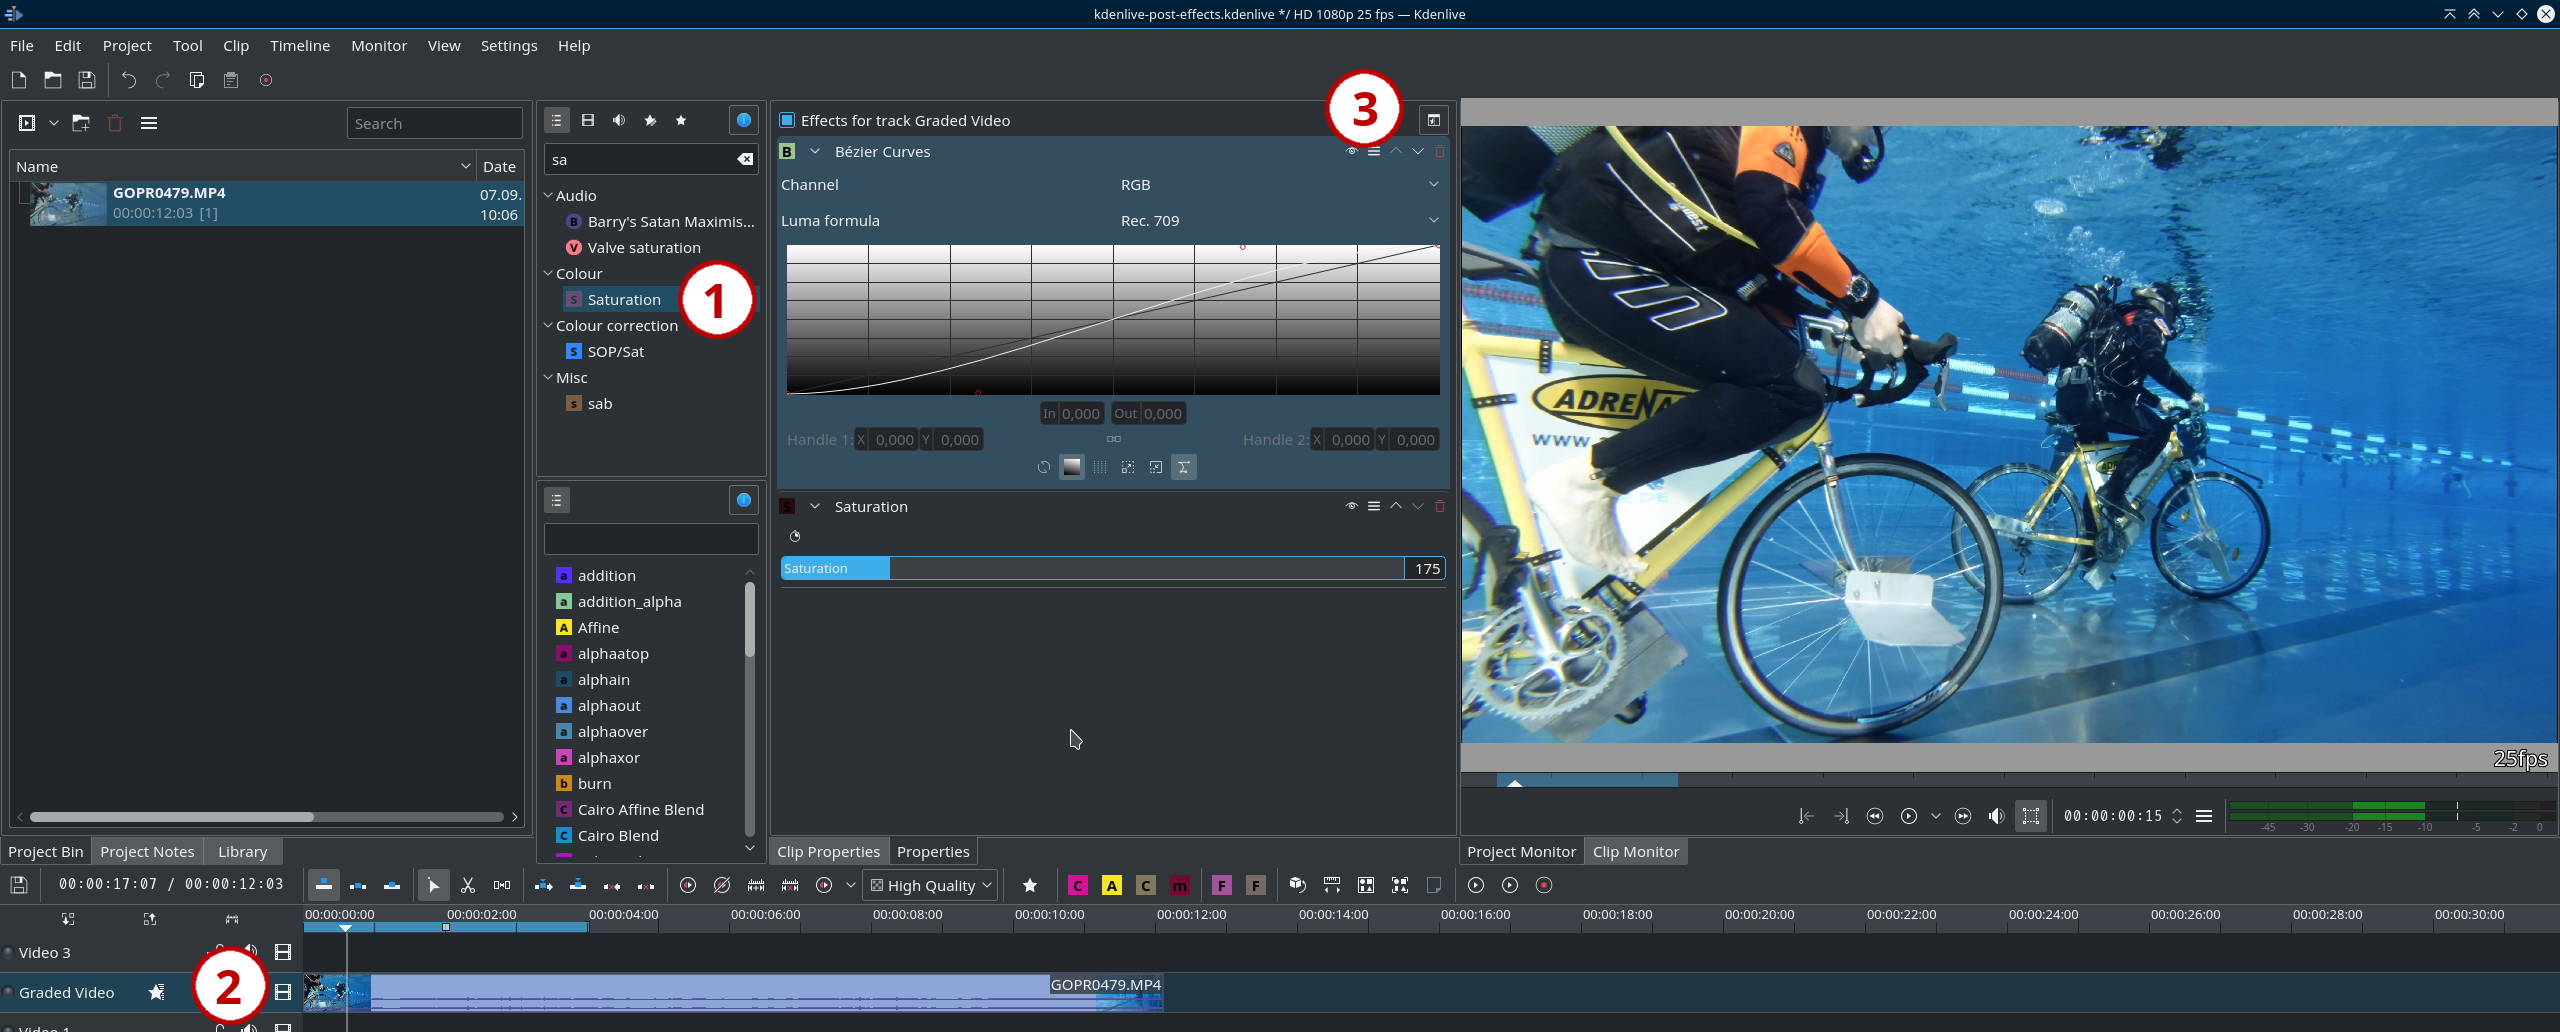
To apply effects to a track in the timeline, simply drag and drop an effect from the effects pane (1) into the desired track in your timeline (2). The parameters pane (3) then will switch to the effects applied to this track. Adjust effects as you like.
There’s one minor catch here: the split compare button unfortunately doesn’t work here, as it applies to individual clips only. It doesn’t work for timeline tracks.
If you later need to return to track effects in order to edit them again, simply click into the header of the desired track. The parameters pane (3) then will automatically switch to your track effect stack.
Temporarily Disable Track Effects
You can (temporarily) disable all effects for a track, by clicking into the track header and then un-checking the Bin effects for… box at the top of the parameters pane (3). This works exactly the same as with effects applied to timeline clips.
 Timeline tracks that have effects directly applied on them show the (usual) effects signet: a star. It shows up after the clip title. In single-line layout, the effects signet shows up in between the clip title and the track controls.


